5. Configure Click to Call
For this feature, we need to prepare some UI macros. There’s two ways to implement the feature. Please choose one suitable option for your environment.
1. Automatic way:
Go to “Scripts – Background” page:

Copy from the following script and paste here and click run, the purpose of this step is creating a mark any field with type phoneNumber field in the system with attribute brekeke_phone.
var uiMacro = new GlideRecord("sys_dictionary");
uiMacro.addEncodedQuery("internal_type=ph_number");
uiMacro.query();

while (uiMacro.next()) {
    var attributes = uiMacro.attributes;

    var newAttribute = 'field_decorations=x_talkd_td_call_with_talkdesk,';
    uiMacro.attributes = newAttribute + attributes;
    uiMacro.update();
    gs.log('UI Macro added');
    if (uiMacro.attributes.includes('ref_contributions=') && !uiMacro.attributes.includes('brekeke_phone')) {
        var newAttribute = attributes.replace('ref_contributions=', 'ref_contributions=brekeke_phone;');
        uiMacro.attributes = newAttribute;
        uiMacro.update();
        gs.log('UI Macro updated');
    } else {
        var newAttribute = 'ref_contributions=brekeke_phone,';
        uiMacro.attributes = newAttribute + attributes;
        uiMacro.update();
        gs.log('UI Macro added');
    }
}
Move to the next step “Creating UI Macro “.
2. Manual way:
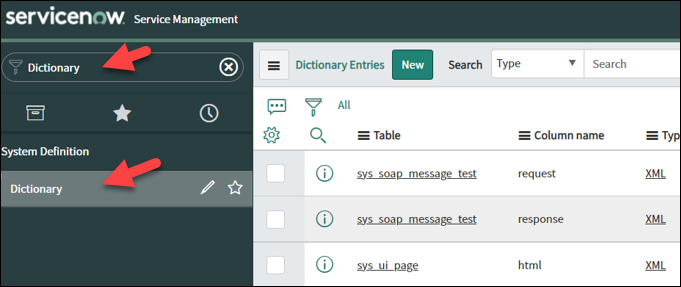
Go to the “Dictionary page” by enter “Dictionary” in search box.
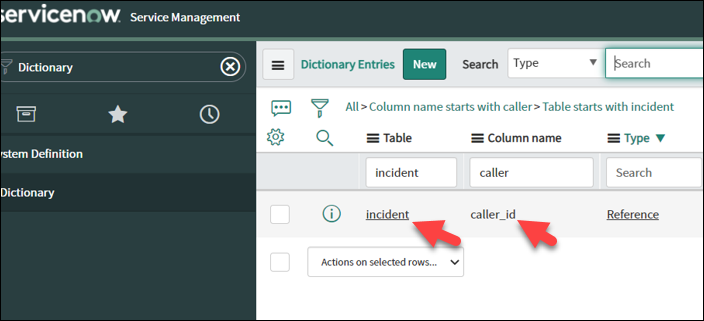
Search for arbitrary column name and edit its attribute as show below, in this example I search for column “Caller” in table “Incidents”.
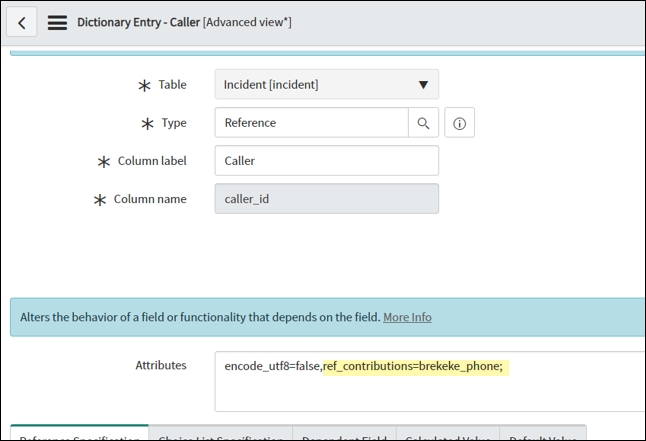
Dive into the item and add ref_contributions=brekeke_phone. Then click save.
Move to the next step “Creating UI Macro “.
Creating UI Macro (This step is needed for both ways):
Enter “UI Macro” in search box and then click [New] button.
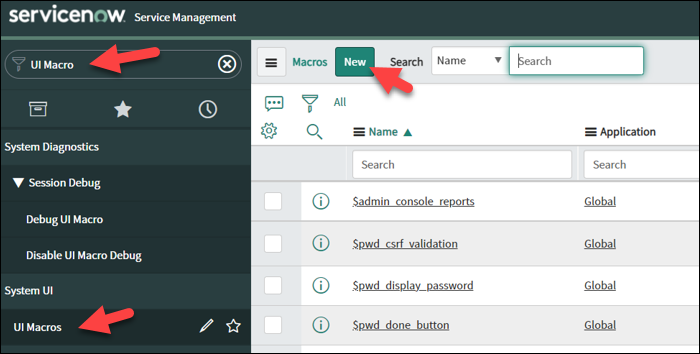
Enter the name “brekeke_phone” and fill in the xml text area the script:
<?xml version="1.0" encoding="utf-8" ?>
<j:jelly trim="false" xmlns:j="jelly:core" xmlns:g="glide" xmlns:j2="null" xmlns:g2="null">
    <j:set var="jvar_n" value="caller_phone_${ref}"/>
    <g:evaluate var="jvar_safe_js_ref" jelly="true">
        ref = jelly.ref.split('.').join('');
    </g:evaluate>

    <g2:evaluate var="jvar_caller_id" jelly="true">
        var caller_id = __ref__.getValue("caller_id");
        caller_id;
    </g2:evaluate>

    <g2:evaluate var="jvar_phone" jelly="true">
        var phone;
        phone = __ref__.getDisplayValue("phone");

        phone;
    </g2:evaluate>

    <g2:evaluate var="jvar_title" jelly="true">

        var caller_id = jelly.jvar_caller_id;
        var phone = jelly.jvar_phone;
        var title;

        if (caller_id) {
        if(phone)
        title = gs.getMessage("Call " + __ref__.getDisplayValue("phone") + " at " + phone);
        else
        title = gs.getMessage("Caller " + __ref__.getDisplayValue("phone") + " does not have a phone specified");
        }
        else {
        title = gs.getMessage("Caller is not specified");
        }

        title;
    </g2:evaluate>

    <img id="${jvar_n}" name="${jvar_n}"
         src='phone.svg'
         class="btn btn-ref btn-default icon-phone"
         title="$[jvar_title]"
         onclick="processCall('$[jvar_phone]')" >
        <span class="sr-only">
            $[jvar_title]
        </span>
    </img>

    <script language="javascript">
        function processCall(phone) {
        phone = phone.replaceAll("(", "").replaceAll(")", "").replaceAll("-", "").replaceAll(" ", "");
        var data = {"phoneNumber": phone};
        var context = { "payload": data, "method": "openframe_communication" };
        CustomEvent.fireAll("openframe_request", context);
        }
    </script>
</j:jelly>
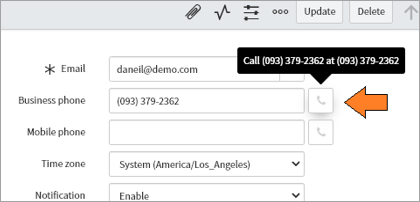
If the configuration is successfully completed, the click to call buttons are available on the phone number fields.