
Connecting with Kapanga
Kapanga is a Session Initiation Protocol (SIP) software phone capable of voice, fax, and video over IP communications. As a SIP phone, Kapanga can be used on Voice over IP networks to interact with traditional Public Switching Telecommunication Networks (PSTNs) and future IP-based telecommunication devices. This document explains how to use Brekeke SIP Server with the Kapanga Soft Phone.
Install and Start Kapanga
- Download and install Kapanga from www.kapanga.net
- Start Kapanga from the start menu.
Configure Kapanga
Once you have started Kapanga, click “K” icon to open the settings from “Configuration” menu
1.General Settings
Click the “K” icon -> Configuration -> General Settings.
Set up as below:

2. Configuration > Call Control Settings
2.1. Choose tab “Media Related”
– Select and add Codecs
– Select DTMF Transport type
– Uncheck field “No reconfig if defferent SSRC”
2.2. Click “SIP Parameters” tab
– Select field “Send Hold SDP reINVITEs ”
– Set User information

Note: “ 192.168.0.165” (example) in Default URL is Brekeke SIP Server’s IP address.
Also, here we have chosen Username and Display Name “2000” as an example.
2.3. Click “Proxy Configuration” tab and make the following changes
In Registration: Authorization User “2000” is an example we choose to set. You can choose to set your choice of Authorization User and Password.
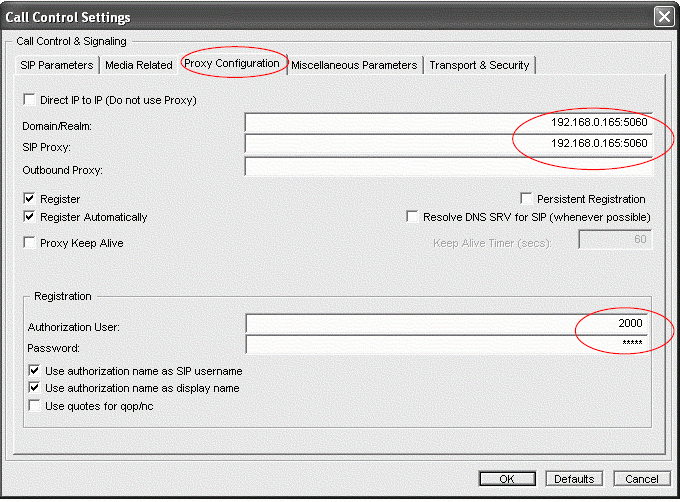
Note: DomainRealm & SIP Proxy : Should contain the IP address of a Brekeke SIP Server running on.
2.4. Click tab “Transport & Security”: Change the Local UDP SIP Port to 5062
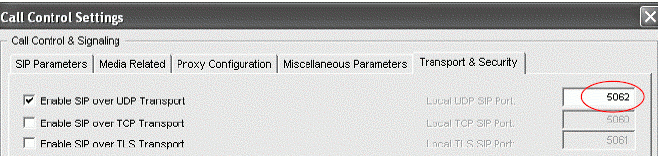
Note: A user does not have to configure in this dialog if they are using Kapanga and Brekeke PBX on two different PCs, the default 5060 is sufficient.
2.5. Restart Kapanga Soft Phone
Kapanga Soft Phone will have registered with Brekeke SIP server.
Confirm that the Kapanga Soft Phone is registered by checking the Registered List of the Brekeke SIP Server Administration Tool > [Registered Clients] page.