
Brekeke PBX settings for Jeron Provider 790 and Cisco CallManager
Conceptual diagram
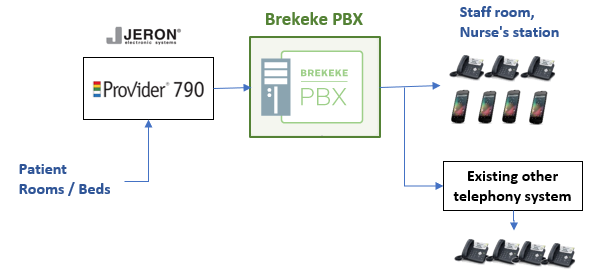
1. Jeron Provider 790 Setup
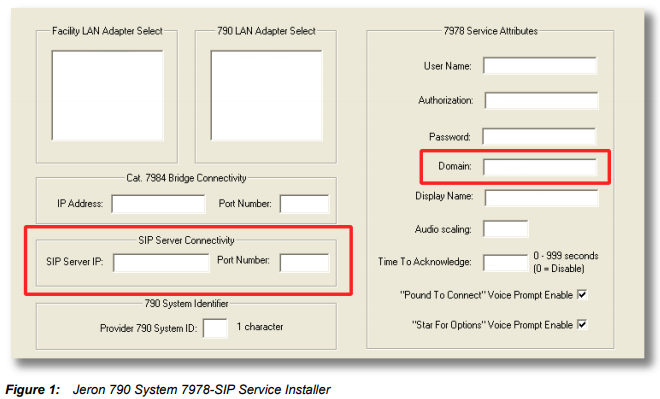
1.1 Configure the SIP Server Connectivity
Set Brekeke PBX Server’s IP address in the [SIP Server IP] field and its port number in the [Port Number] field under the [SIP Server Connectivity] section. The default port number of the bundled SIP Server in Brekeke PBX is 5060. (Figure 1)
1.2 Configure the 7978 Service Attributes
Set Brekeke PBX’s IP address in the [Domain] field under the [7978 Service Attributes] section. (Figure 1)
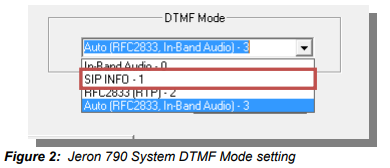
1.3 Configure the DTMF Mode
For allowing a handset to dial to Jeron Provider 790 directly as one-stage dialing, set [DTMF Mode] to use SIP INFO(Figure 2).
2. Cisco Unified Communications Manager Setup
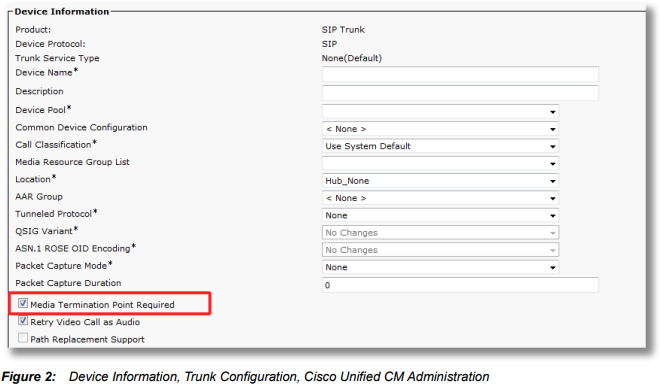
2.1 Enable the MTP (Media Termination Point Required)
To include the SDP (Session Description Protocol) body in the INVITE sent from the CUCM (Cisco Unified Communications Manager), check the [Media Termination Point Required] box under the [Device Information] section in the [Trunk Configuration]. (Figure 2)
2.2 Set the Destination Address
To send and receive an INVITE between the CUCM and Brekeke SIP Server, set Brekeke SIP Server’s IP address in the [Destination Address] field under the [SIP Information] section in the [Trunk Configuration]. (Figure 3)
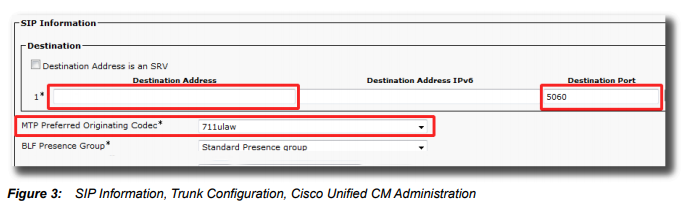
2.3 Set the MTP Preferred Originating Codec
To use G.711 u-law as the audio codec, select “711ulaw” from the [MTP Preferred Originating Codec] field under the [SIP Information] section in the [Trunk Configuration]. (Figure 3)
2.4 Disable the SIP Session Timer
To avoid sending a re-INVITE from the CUCM, disable the SIP Session Timer in the CUCM.
3. Brekeke PBX Settings
3.1 Common Settings in Bundled SIP server
– Configure the SIP proxy
1) Navigate to the [Configuration] -> [SIP] page.
2) Under the [SIP exchanger] section, set the [B2B-UA mode] field to “on.”
3) Under the [Authentication] section, set the [REGISTER] and [INVITE] fields to “off.”
– Configure the RTP relay
1) Navigate to the [Configuration] -> [RTP] page.
2) Set the [Port mapping] field to “sdp.”
3.2 Dialplan Settings
In this example, the following scenario is assumed.
Extension 500-599 : These phones don’t use Brekeke PBX’s features. All calls to 5XX will bypass PBX and reach destinations. (Use only bundled SIP server.)
Extension 600-699 : These phones don’t use Brekeke PBX’s features. All calls to 6XX will bypass PBX and forward to other existing telephony server (Cisco UC manager).
Extension except 5XX and 6XX : These users have their own account in Brekeke PBX, and can use Brekeke PBX’s features (group extension, call recording, conference call, voice mail, and more.) For example, a call to the group extension 3000 will be routed to PBX then forwarded to destinations (200 and 201). |
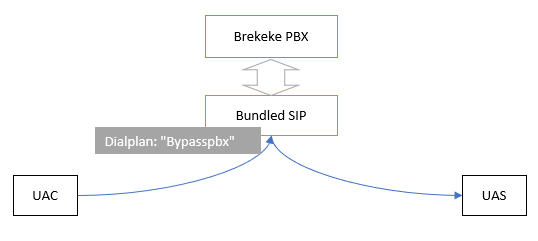
3.2.1 Add the dialplan rule to bypass pbx for normal nurse calls.
With the following example, all calls to 5XX will bypass PBX and reach UAS.

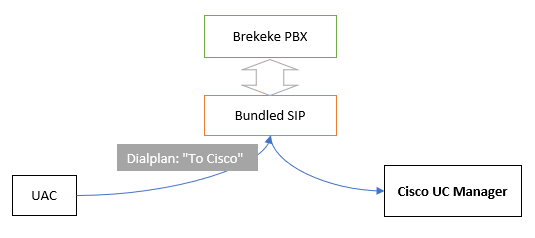
With the following example, all calls to 6XX will bypass PBX and be forwarded to Cisco UC manager (172.16.200.42).
![]()
*The above dialplan rules should be set as higher priority than default dialplan rules.
*Don’t update default dialplan rules.
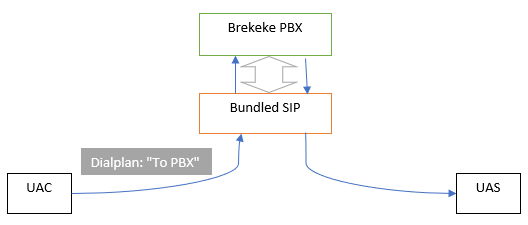
3.2.2 Add the dialplan rule to allow special nurse calls to be forwarded to Brekeke PBX.
For the nurse calls from Jeron system to the group extension or to extension in Brekeke PBX (except 5XX and 6XX), this dialplan rule allows these calls to be forwarded to Brekeke PBX.

In this example, the following points are assumed:
- Jeron system’s IP address is “172.16.200.12“.
- INVITE messages from Jeron system have “sip:800@” as a part of value in the from header.
*The dialplan rule “To PBX from Jeron“should be set as lower priority than the rules set at step 3.2.1.
*The dialplan rule “To PBX from Jeron” should be set higher priority than the default dialplan rule “To PBX“.
3.3 PBX Settings
3.3.1 Create PBX users.
At [Extensions] > [Users], create extensions (200, 201) that can be added as destination to group extensions (3000).
3.3.2 Create group extension.
At [Extensions] > [Groups], create group extension 3000 and add destinations (200, 201).
Reference : Brekeke PBX Quick start guide>>
3.4 Set SIP-INFO parameter
1) Navigate to the [PBX] ->[Options] ->[Advanced]
2) Set the following parameter and save.
com.brekeke.tel.sip.SipTelephone.SEND_DTMF_TYPE=info:dtmf-relay
4. Optional Setting
In the case that calls are routed to the Brekeke PBX, the value of “display name” of the from header in INVITE messages are replaced with user name of the caller’s account as default.
If display name field is used for messaging, and the values of display name in the INVITE messages from Jeron system should be kept, add the following ARS route or add the similar patterns to your existing appropriate ARS route at [PBX] >[ARS] page.
In this example, we assume that INVITE messages from Jeron system have the strings “sip:800@” as a part of the from header.
Pattern-IN---------------------------
Matching patterns
[From]: (.*)sip:(800)@

Deploy patterns
[Custom]: &nurse-info=&f1

Pattern-OUT-------------------------
Matching patterns
[From]: (.*)sip:(800)@(.+)

Deploy patterns
[From]: &{nurse-info}sip:&f2@&f3