Download Phonebook information on provisioning
Brekeke PBX provides the function to download Phonebook information from Brekeke PBX to user’s SIP device as a part of provisioning features.
Diagram:
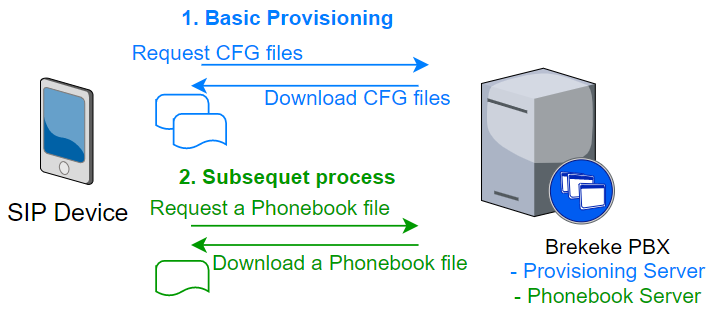
Flow 1. On the basic provisioning process, sip devices get the URL of the remote phonebook server where phonebook information is located.
Flow 2. On the subsequent process, based on the obtained URL, the sip device tris to download phonebook file from the remote phonebook server.
Example of Settings (Yealink T2x/T4x series case):
1. Add phonebook server address (URL) to the provisioning CFG file.
Additionally, set the phonebook server address and related information on the provisioning settings page of Brekeke PBX. Regarding the basic provisioning configuration, refer to the “Provisioning Feature Setup Guide“.
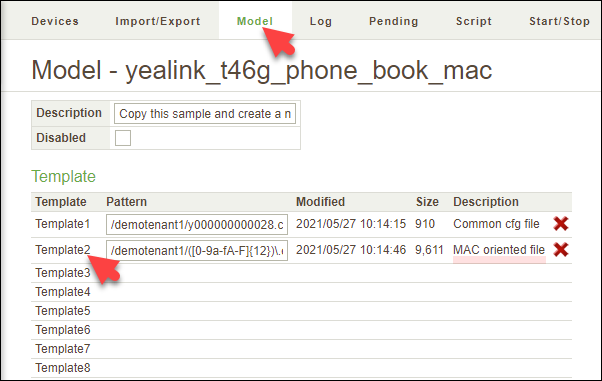
Step 1-1. Edit the mac oriented file of your yealink model.
At the [SYSTEM] > [Provisioning] > [Model] page, select your model used for yealink device provisioning and open it. Then, edit “Template2” (Mac oriented file).
Add the following parameters that will be used to define phonebook configurations. Then click [Save].
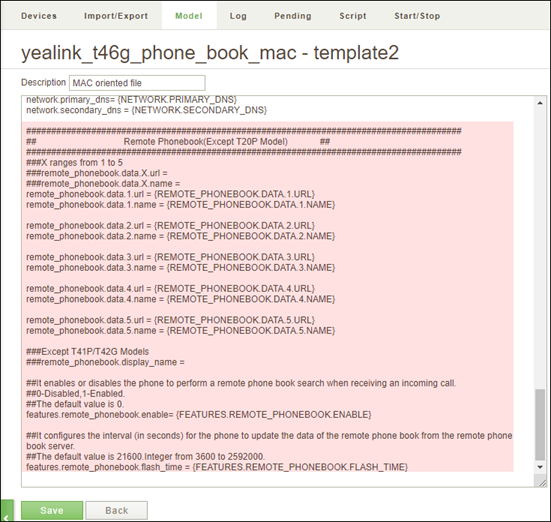
Added parameters (mac.cfg)
#######################################################################################
## Remote Phonebook(Except T20P Model) ##
#######################################################################################
###X ranges from 1 to 5
###remote_phonebook.data.X.url =
###remote_phonebook.data.X.name =
remote_phonebook.data.1.url = {REMOTE_PHONEBOOK.DATA.1.URL}
remote_phonebook.data.1.name = {REMOTE_PHONEBOOK.DATA.1.NAME}

remote_phonebook.data.2.url = {REMOTE_PHONEBOOK.DATA.2.URL}
remote_phonebook.data.2.name = {REMOTE_PHONEBOOK.DATA.2.NAME}

remote_phonebook.data.3.url = {REMOTE_PHONEBOOK.DATA.3.URL}
remote_phonebook.data.3.name = {REMOTE_PHONEBOOK.DATA.3.NAME}

remote_phonebook.data.4.url = {REMOTE_PHONEBOOK.DATA.4.URL}
remote_phonebook.data.4.name = {REMOTE_PHONEBOOK.DATA.4.NAME}

remote_phonebook.data.5.url = {REMOTE_PHONEBOOK.DATA.5.URL}
remote_phonebook.data.5.name = {REMOTE_PHONEBOOK.DATA.5.NAME}

###Except T41P/T42G Models
###remote_phonebook.display_name =

##It enables or disables the phone to perform a remote phone book search when receiving an incoming call.
##0-Disabled,1-Enabled.
##The default value is 0.
features.remote_phonebook.enable= {FEATURES.REMOTE_PHONEBOOK.ENABLE}

##It configures the interval (in seconds) for the phone to update the data of the remote phone book from the remote phone book server.
##The default value is 21600.Integer from 3600 to 2592000.
features.remote_phonebook.flash_time = {FEATURES.REMOTE_PHONEBOOK.FLASH_TIME}
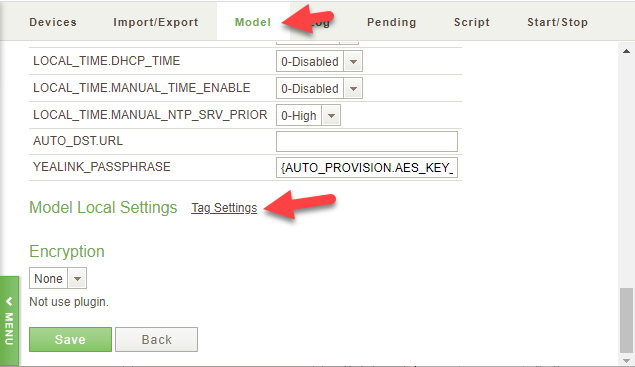
Step 1-2. Add local tags.
On the model setting page, click the text link “Tag Setting” at the [Model Local Settings] section.
At the bottom of the Tag section, here as an example, add the following new tags.
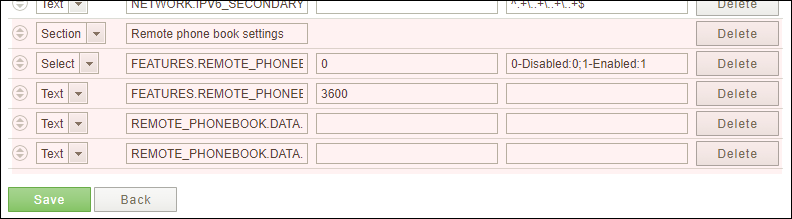
New tags
| Field Type | Field Name | Initial Value | Input Rule |
| Section | Remote phone book settings | ||
| Select | FEATURES.REMOTE_PHONEBOOK.ENABLE | 0 | 0-Disabled:0;1-Enabled:1 |
| Text | FEATURES.REMOTE_PHONEBOOK.FLASH_TIME | 3600 | |
| Text | REMOTE_PHONEBOOK.DATA.1.URL | ||
| Text | REMOTE_PHONEBOOK.DATA.1.NAME |
Step 1-3. Set local tags’ value on each device setting page.
On each device setting page, set values into newly added tag fields. Here, as an example, the phone device used by extension 100 on tenant “demotenant1” will be edited.
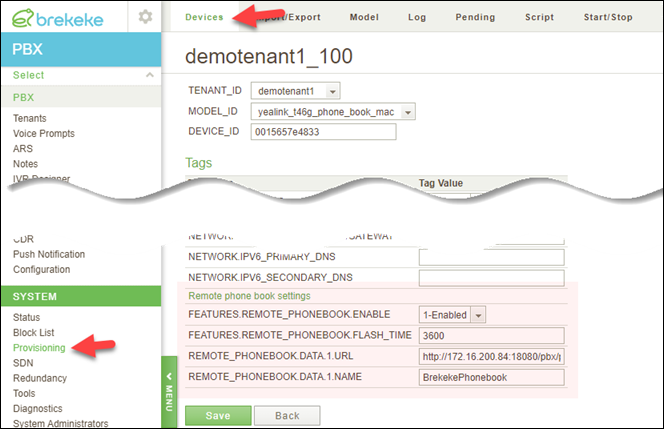
Example of valules:
- FEATURES.REMOTE_PHONEBOOK.ENABLE: “1-Enabled”,
- FEATURES.REMOTE_PHONEBOOK.FLASH_TIME: 3600,
- REMOTE_PHONEBOOK.DATA.1.URL: http://172.16.200.84:18080/pbx/pv/demotenant1/100/phonebook.xml
Syntax:
http://<PBX address>:<port>/pbx/pv/<tenant name>/<extension>/<phonebook file name>
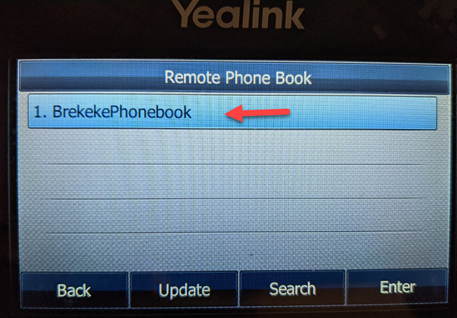
- REMOTE_PHONEBOOK.DATA.1.NAME: BrekekePhonebook
2. Setup a Script.
Setup a script to create a phonebook.xml based on the phonebook information of each extension user on PBX.
Step 2-1. Setup a script on PBX
Move to [SYSTEM] >[Provisioning] > [Script] page. Then click [New Script] button.
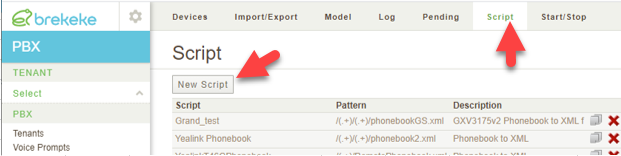
Here, as an example, create a new script “YealinkT46Phonebook_mac“.
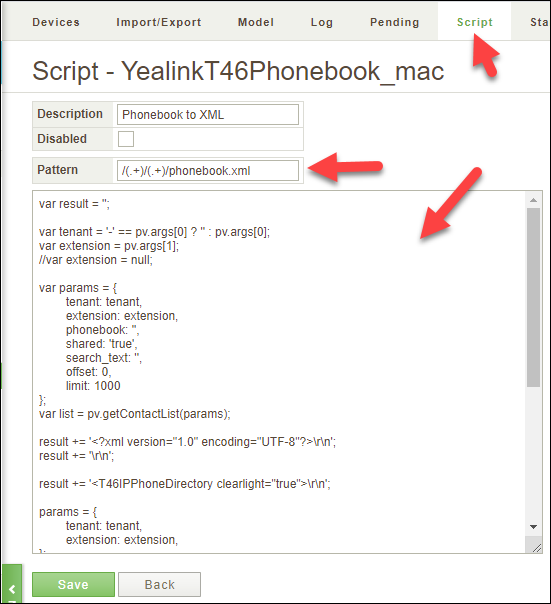
Pattern: “/(.+)/(.+)/phonebook.xml”
Script:
var result = '';
var tenant = '-' == pv.args[0] ? '' : pv.args[0];
var extension = pv.args[1];
//var extension = null;
var params = {
    tenant: tenant,
    extension: extension,
    phonebook: '',
    shared: 'true',
    search_text: '',
    offset: 0,
    limit: 1000
};
var list = pv.getContactList(params);
result += '<?xml version="1.0" encoding="UTF-8"?>\r\n';
result += '\r\n';
result += '<T46IPPhoneDirectory clearlight="true">\r\n';
params = {
    tenant: tenant,
    extension: extension,
};

for(var i = 0; i < list.length; i ++){
    params.aid =  list[i].aid
    var contact = pv.getContact(params);
    result += '<DirectoryEntry>\r\n';
    result += '<Name>' + contact.info.$firstname + '</Name>\r\n';
    result += '<Telephone>' + contact.info.$tel_home + '</Telephone>\r\n';
    result += '<Telephone>' + contact.info.$tel_work + '</Telephone>\r\n';
    result += '<Telephone>' + contact.info.$tel_mobile + '</Telephone>\r\n';
    result += '</DirectoryEntry>\r\n';
}
result += '</T46IPPhoneDirectory>\r\n';
res.setContentType('application/xml; charset="UTF-8"');
var writer = res.getWriter();
writer.print(result);
writer.flush();
All set.
Start provisioning process.
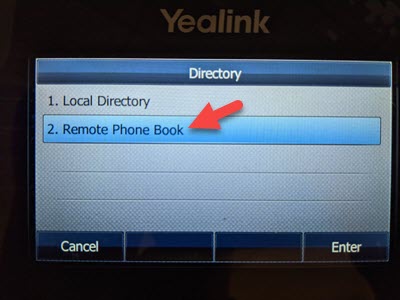
3. Check the remote phone book on the Yealink device.