
Login Brekeke CCS using BLF function
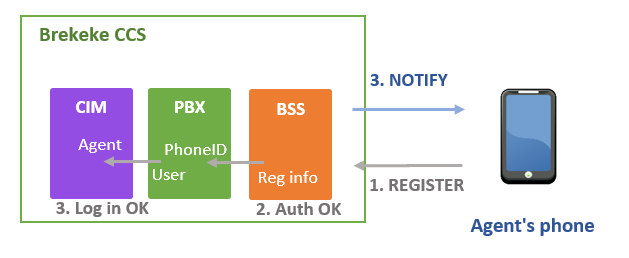
Brekeke PBX supports one-step login to the Brekeke Contact Center Suite (Brekeke CCS) with BLF-enabled phones. This feature allows the user of each phone (hereafter referred to as agent) to log in to Brekeke CCS by pressing the BLF button. This eliminates the multiple steps previously required to login to Brekeke CCS.
(※This function is available on Brekeke PBX v3.12.1.5 or later with Brekeke CIM v2.7.8 or later.)
Authentication Mechanism
If the authentication of the SIP REGISTER request from the terminal is completed without an issue, Brekeke CIM allows the agent who is tied to this SIP user (= Phone ID) to log in.
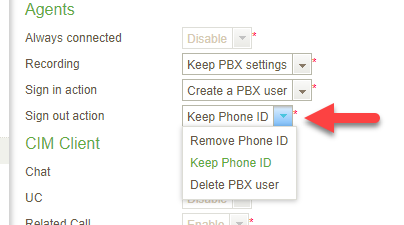
* Do not delete the target user (agent) or Phone ID from the user setting screen in Brekeke CIM. To prevent accidental deletion, we recommend setting “Keep Phone ID” in [Sign out action] on the user setting screen.
Change Agent Status
“Agent status” refers to the status of each agent in Brekeke CCS. The status includes “Offline, Ready, Idle, Talking, Work, and Wrap up“. The system assigns calls to each agent based on this status.
By using the BLF button, agents can log into the system and update their agent status. The current agent status can be reviewed by checking the LED display (color, lighting/blinking) of the button.
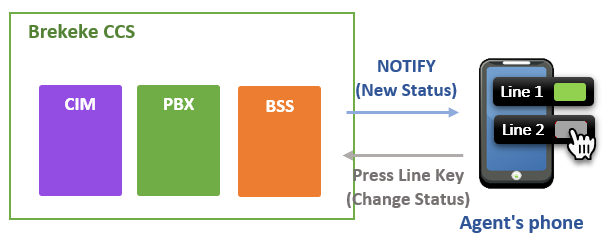
When the Brekeke CCS updates the agent status, the Brekeke PBX sends a NOTIFY message to the phone containing the value of the state that represents the agent status. The LED display (color, lighting/blinking) of the phone will be updated based on the state value it received.
Settings on the phone
The line key (BLF) setting varies by phone manufacture and its models. Follow the instruction provided by the phone manufacture to have an accurate setup for the function.
Please note that depending on the Brekeke CCS edition (standard/lite), the number of line keys used on each phone and the value to be assigned to the line keys varies.
1. Case – Brekeke CCS Lite edition:
In Lite edition, the agent status uses only three types of status, “Offline, Work, and Talking“, so one line key (BLF) is set on the phone for displaying/changing the status.
When setting the line key (BLF) on the phone, set the value (identifier) using the prefix “cim“, “cim1“. ※1
| Line Key Label | Value (Identifier) |
| Line1 | cim1 |
<Agent status indicated by the line key and the transition destination(next agent status)>
| Agent Status | State value received on the line key “Line1” | Line key LED display example ※2 | Next agent status when you press Line1 |
| Offline | 0: terminated or Not received NOTIFY |
 |
Work |
| Work | 1: early |  |
Offline |
| Talking | 2: confirmed |  |
Not Change |
2. Case – Brekeke CCS standard edition:
In standard edition, the agent status uses 6 types of status: Offline, Work, Talking, Ready, Idle, and Wrap up, so the two-line keys (BLF) are needed for displaying/changing the status. ) on the phone.
When setting the line key (BLF) on the phone, set the value (identifier) using the prefix “cim“, “cim2/1“, “cim2/2“. ※1
| Line Key Label | Value (Identifier) |
| Line1 | cim2/1 |
| Line2 | cim2/2 |
<Agent status indicated by the line key and the transition destination(next agent status)>
| Agent Status | State value received on the “Line1” | State value received on the “Line2” | LED example※2 | Next agent status when Line1 is pressed | Next agent status when Line2 is pressed |
| Offline | 0: terminated or Not received NOTIFY |
0: terminated or Not received NOTIFY |
 |
Work | Idle |
| Ready | 2: confirmed | 0: terminated |  |
Work | Idle |
| Idle | 0: terminated | 1: early |  |
Work | Offline |
| Talking | 2: confirmed | 2: confirmed |  |
Not Change | Not Change |
| Wrapup | 1: early | 1: early |  |
Work | Idle |
| Work | 1: early | 0: terminated |  |
Ready | Idle |
– When the status is “Talking“, The agent cannot change the status with the line key button.
– Line key “Line1” functions as a switch button to “Work“. If you press Line 1 in a status other than “Work”, it will transition to “Work”. If you press Line 1 during “Work”, it will transition to “Ready“.
– The line key “Line2” acts as a switch button to “Idle“. If you press Line2 in a status other than “Idle”, it will transition to “Idle”. If you press Line2 during “Idle”, it will transition to “Offline“.
3. Case – Brekeke CCS standard (In the case the phones cannot handle the difference between “early” and “confirmed”):
This is the case when Standard edition is used and the phones do not recognize the difference between “early” and “confirmed” of the state in the NOTIFY message. Since this type of phone do not distinguish LED display (color/lighting/blinking), three line key (BLF) is needed to display agent status.
When setting the line key (BLF) on the phone, set the value (identifier) using the prefix “cim”, “cim3/1“, “cim3/2“, “cim3/3“. ※1
| Line Key Label | Value (Identifier) |
| Line1 | cim3/1 |
| Line2 | cim3/2 |
| Line3 | cim3/3 |
<Agent status indicated by the line key and the transition destination(next agent status)>
| Agent Status | State value received on the “Line1” | State value received on the “Line2” | State value received on the “Line3” | Next agent status when Line1 is pressed | Next agent status when Line2 is pressed | Next agent status when Line3 is pressed |
| Offline | 0: terminated or Not received NOTIFY |
0: terminated or Not received NOTIFY |
0: terminated or Not received NOTIFY |
Ready | Idle | Work |
| Ready | 2: confirmed | 0: terminated | 0: terminated | Not Change | Idle | Work |
| Idle | 0: terminated | 2: confirmed | 0: terminated | Ready | Offline | Work |
| Talking | 1: early | 1: early | 1: early | Not Change | Not Change | Not Change |
| Wrapup | 1: early | 0: terminated | 1: early | Ready | Idle | Work |
| Work | 0: terminated | 0: terminated | 2: confirmed | Ready | Idle | Not Change |
※1. Although any value (identifier) “cimxxxx” (xxxx is an arbitrary character string) using the “cim” prefix can be used in the BLF settings, it is highly recommended to use the value (identifier) in each table. By using the value, the setting on the Brekeke PBX becomes unnecessary.
※2.In theLED display examples, it is assumed that the phone can identify the difference between state = early and state = confirmed and based on the state value, that the LED color is configured beforehand to change like early-> red, confirmed-> green .