Brekeke PBX Wiki

  1. Brekeke PBX basic Info
  2. Security
  3. Update & Upgrade
  4. Configuration
    1. Installation
    2. User Management
    3. Brekeke PBX default settings
    4. Network Configuration
    5. Brekeke PBX Administration Tool
    6. Functions Configuration
      1. Processes on Brekeke PBX
      2. Performance optimization
      3. Access Control - System Admin Menu
      4. Tenant Admin Permission
      5. ARS (Automatic Route Selection)
      6. DID
      7. Auto Attendant
      8. BLF, SCA, and Presence
        1. Busy Lamp Field (BLF)
        2. Queued Call Management with Advanced BLF
        3. Login Brekeke CCS using BLF function
        4. Presence
        5. Shared Call Appearance (SCA)
          1. SCA Settings on the phone side
          2. SCA Settings on Brekeke PBX (3.6 ~)
      9. Codec
      10. Voicemail
      11. Back up Brekeke PBX
      12. Callback
      13. Call Forwarding
      14. Call Hold/Call Transfer
      15. Call Hunting
      16. Call Pickup, Call Park
      17. Call Queue
      18. Call Waiting
      19. Conference Call
      20. Confirm Call
      21. Video Call
      22. Fax Support
      23. Flow Selection for a tenant
      24. Paging
      25. Phone ID settings
      26. Ring Group
      27. SRTP Support
      28. Stereo Recording Support
      29. Switching Plan
      30. Three-Way Calls
      31. Tutor Mode
      32. Caller ID from analog (PSTN) phones
      33. Change busy forwarding destination according to response
      34. Change Music On Hold
      35. Rotate Music On Hold
      36. Change recorded audio files destination location
      37. Change RFC2833 Payload
      38. Customize login page for each tenant
      39. Download phonebook info on provisioning
      40. Replace display name
      41. Session Management
      42. Set RTP packet's TOS value
      43. TCP Support
      44. Third-Party Call Control
      45. Microsoft OCS
      46. How to bypass Brekeke PBX
      47. How to create voice files (Fo IVR, Auto Attendant, Guidance) using your phone
      48. WebRTC
      49. Web Phone / Brekeke Phone
      50. Text to Speech
    7. Brekeke PBX Redundancy
    8. Remote Access of Brekeke Heartbeat
  5. Brekeke PAL option
  6. Integration with Zoho Products
  7. Integration with Microsoft Teams
  8. Add-ons
  9. Troubleshooting
  10. Developer's Guides
  11. User's Guide
  12. Version History

SCA Settings on the phone side

With the SCA setup and register phone SCA line as below, at Brekeke PBX Admitnool > [SIP Server Admin] > [Registered Clients], there will be registration records with prefix “line-“ or postfix “~line” corresponding to phones’ SCA line


Notice:

If authentication for REGISTER and INVITE is set as ON at [SIP Server Admin] > [Configuration] > [SIP] page, the authentication users should be created as follows;


Brekeke v3.5 or older:

Create an authentication account for each phone’s sca line, and use prefix “line-” + phone_ID as authentication user ID set at both Brekeke server [User Authentication] account [user]and phone side.

Example
Phone ID / SIP User:   “p360” (You have to create at [SIP SERVER] > [User Authentication])
SIP User for SCA line: “line-p360” (You have to create at [SIP SERVER] > [User Authentication])


Brekeke PBX v3.6 or later:

Create an authentication account for each phone’s sca line, and use phone_ID + “~line” as authentication user ID set at only phone side. You do not have to create authentication users for sca line like “phone_ID + ~line” at Brekeke server side.

Example
Phone ID / SIP User:   “p360” (You have to create at [SIP SERVER] > [User Authentication])
SIP User for SCA line: “p360~line” (You do NOT have to create it at Server. System automatically generate it)


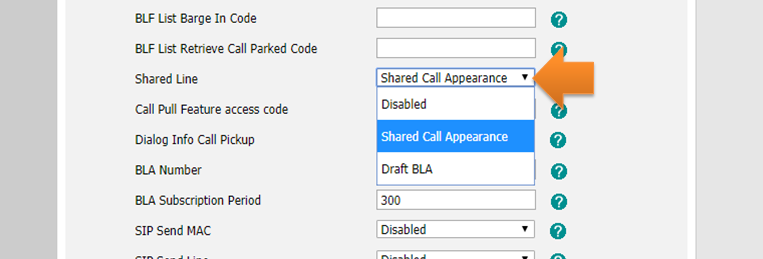
Settings on the phone side for SCA:

Note: If your Brekeke PBX version is 3.5 or before, replace SIP user from “line~p360” to “p360-line” at the following instructions.

Panasonic KX-UT1xx


Panasonic KX-TGP550 T04


Polycom SoundPoint IP650 / 330

  • Prerequisite: None
  • Setup for SCA:

    1. Register a phone line as line~p360 to Brekeke PBX server, and set “Type” as “Shared
    2. Set one or more in [Num Line Keys] field
    3. Save the settings and reboot the phone


Polycom SpectraLink 8440

  • Prerequisite: None
  • Setup for SCA:

    1. From Settings/Lines/Identification, register a line with “line~p360” in fields “Address”
      Type:Shared
      Num Line Keys: 2 or any number as you need
    2. From Settings/Lines/Server 1,
      Special Interop: standard
      Address: Brekeke PBX server IP
      Port:5060
      Register: yes
    3. Save the settings and reboot the phone


Snom 360/7xx/820/870

  • Prerequisite: Firmware version 7 and up
  • Setup for SCA:

    1. Register a phone Identity as “line~p360” to Brekeke PBX server as shared line,
      check [Identity]>[SIP]>[Shared Line] ON
      select [Identity]>[SIP]>[Server Type Support] Broadsoft
    2. Go to “Function Keys”, set any key from P1 to P12 as
      line~p360@PBX_IP ” “Shared Line” “<sip:line~p360@PBX_IP;user=phone> “
    3. Reboot the phone.


Linksys SPA 962 / 941

  • Prerequisite: None
  • Setup for SCA:
    1. Register a phone extension as shared line,
      such as, at phone tab [Ext1], set User ID as “line~p360” and select “shared” at “Share Line Appearance / Share Ext:”
    2. At the [Phone] tab, set any Line Key from 1 to 6 as
      Extension: shared extension number in step 2, here is 1
      Short Name: any name for the Line Key label
      Share Call Appearance: shared
    3. Reboot the phone
  • Note: 
    The following dial plan is needed, when using linksys SPA9xx linekey to pick up shared call, which is put on hold by other phones

    [Matching Patterns:]
    $request = ^INVITE
    $geturi(From) = (^sip:line~.+@.+$)
    To = !sip:.+@
    $pbx.inport = (.+)
    
    [Deploy Patterns:]
    To = %1
    $target = 127.0.0.1:%2
    $transport = udp

Put the above dial plan rule on the top of others and click [Apply Rules] button.


Yealink T4X

  • Prerequisite: Update firmware to the latest version.
  • Setup for SCA:
    1. Select Account and enter “line~p360” at [Register Name] and [User Name] filed.
    2. At [Advanced] >[Shared Line] , select “Shared Call Appearance” and save it.
    3. Assign the configured line as line key at the [DSSkey] page.


Yes No
Suggest Edit